September 28, 2012

Making a Sunburst Background, Simple Masking, and More

Happy Friday everyone!  Each month the My Creative Scrapbook kit club design team girls share tips and techniques that we used with our kit work.

Here are my September tips and techniques using the Main and Creative kits.

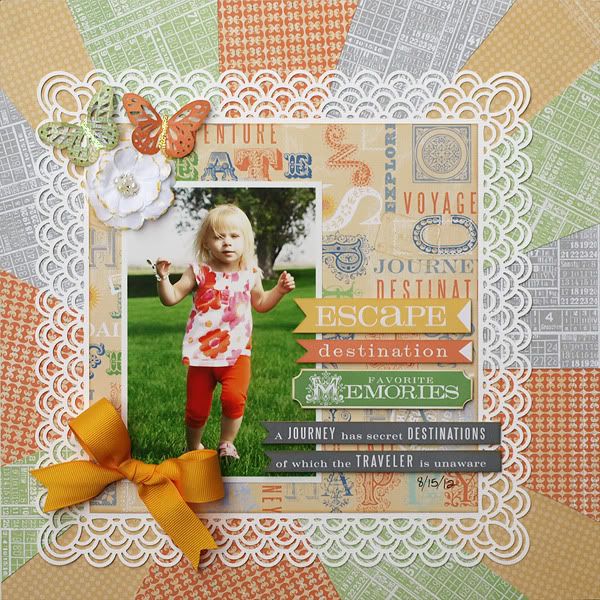
I've been loving the sunburst designs that I've been seeing around the internet lately- I really like how they draw the eye right to the photo. I decided to give it a try and was pleasantly surprised about how simple it was. There are several how-to's for this available in blogland, but I thought I'd share how I did mine.

Posted Image

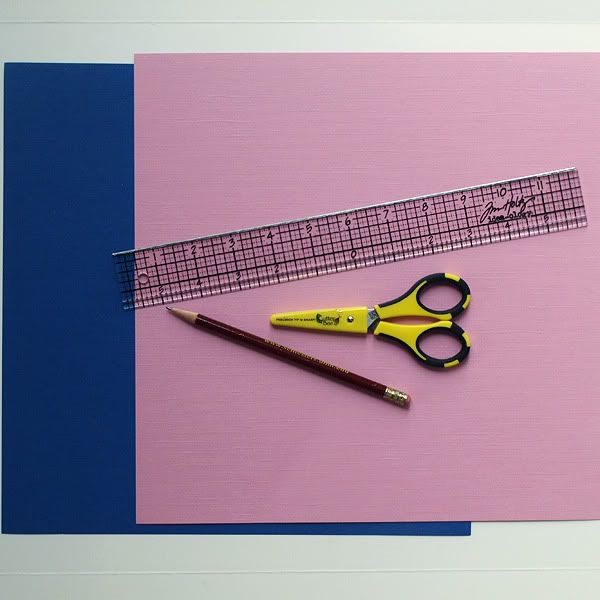
I used 2 full sheets of 12x12 cardstock (the colors don't matter- it'll all be covered up), a straight edge, a pencil, scissors, and of course patterned paper from the kit (paper not shown here).

By the way, sorry about the wonky lighting... natural light in my house is pretty much non-existent.

Posted Image

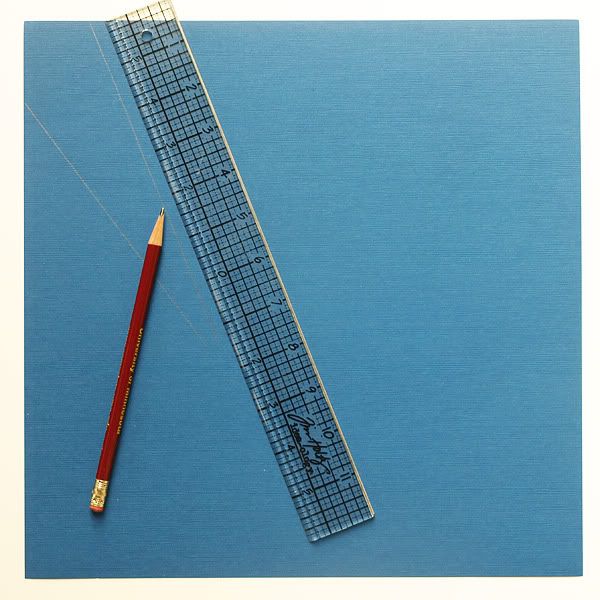
The first step is to make a template. Begin by deciding where the center point of your sunburst will be located. I decided to have my sunburst coming from a bit to the left and a bit below the very center of the page.

Once I decided on that, I just began drawing lines using my pencil and ruler from the outside edge of the sheet of cardstock towards the area that I decided that my sunburst would be bursting from.

I didn't measure the distance between the lines or anything- I just "eyeballed it". I also didn't take care to draw the lines all the way to the exact burst point, as I knew I'd be covering much of the inner part of the sunburst up with my photo and such. See below...

Posted Image

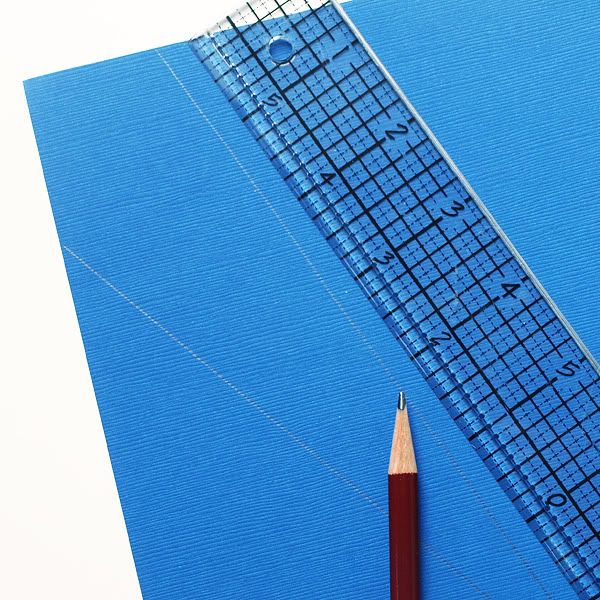
Below is a closer look at my first pair of lines, in case they were hard to see above.

Posted Image

I worked my way around the whole page, drawing a total of 15 lines somewhat evenly spaced apart, going from the outer edge of the sheet of cardstock towards the center point of my sunburst.

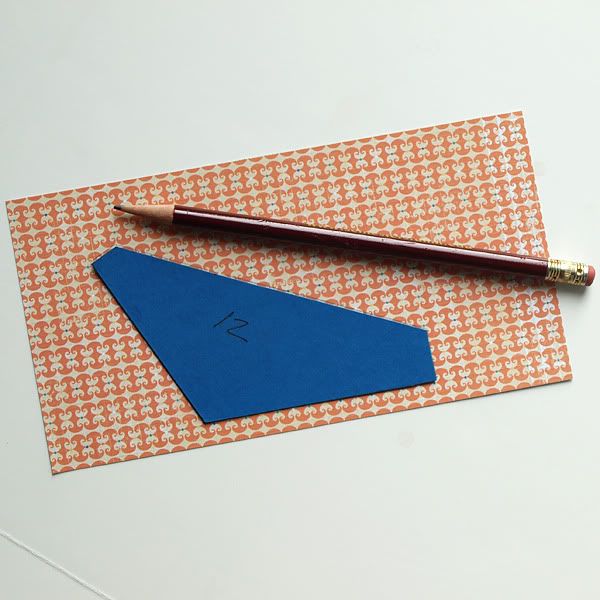
Next, I numbered the pieces from 1 - 15 so that I would know what order they belong in. Then I cut the 15 pieces, or 15 sections of the sunburst template, out.


Posted Image
 

Now that I had my template, all I had to do was trace around each of the 15 sunburst template pieces onto a variety of patterned papers from the kit. I chose 4 different pattern papers that I felt coordinated well with my photo and began tracing. Below is piece number 12.

Posted Image

The next step is to cut out the traced sunburst pieces.

Posted Image

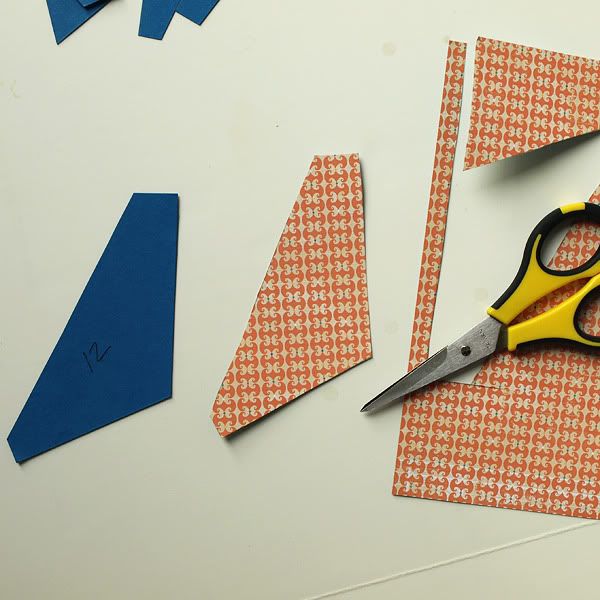
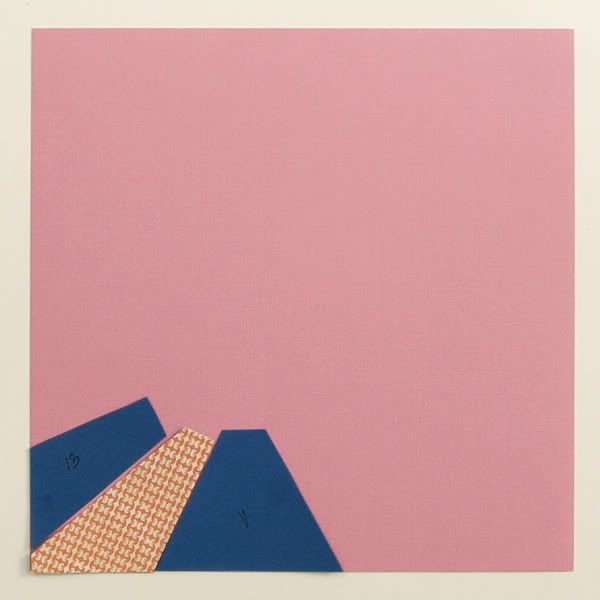
As I cut each piece out, I adhered it to its correct spot on the second sheet of 12x12 cardstock. It didn't matter that my cardstock was pink because it was all going to be covered up with the beautiful papers from the kit.

A little tip- I recommend using a liquid glue for this because it gives you a few seconds to slide the sunburst pieces around a bit until you get them exactly where you want them, unlike most dry adhesives which are pretty much stuck the second you lay them down.

Posted Image

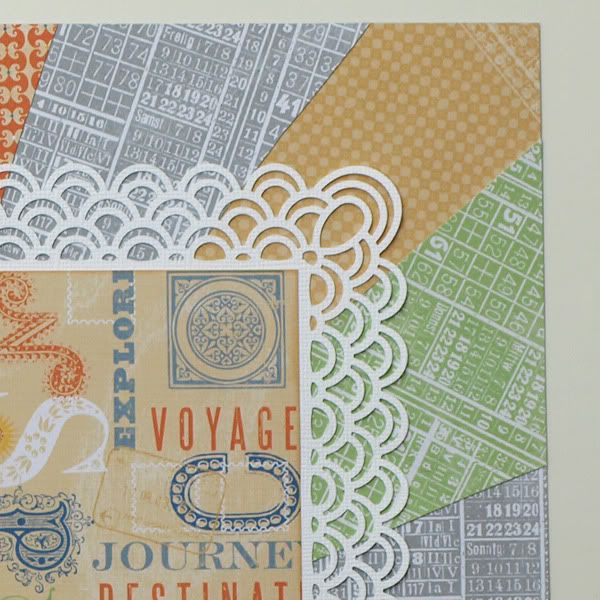
Once all 15 patterned paper sunburst pieces are cut out and adhered, you can layer on top of your sunburst as desired.

Posted Image

Try it! It is a bit time-consuming, but it's super easy and results in a fun background for your layout!

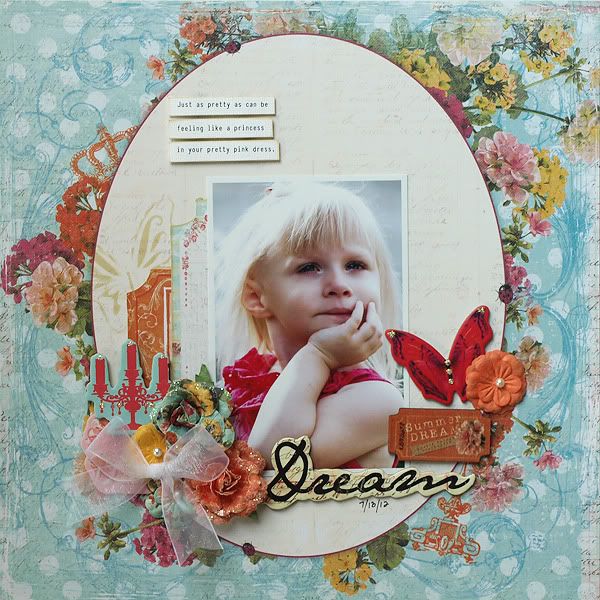
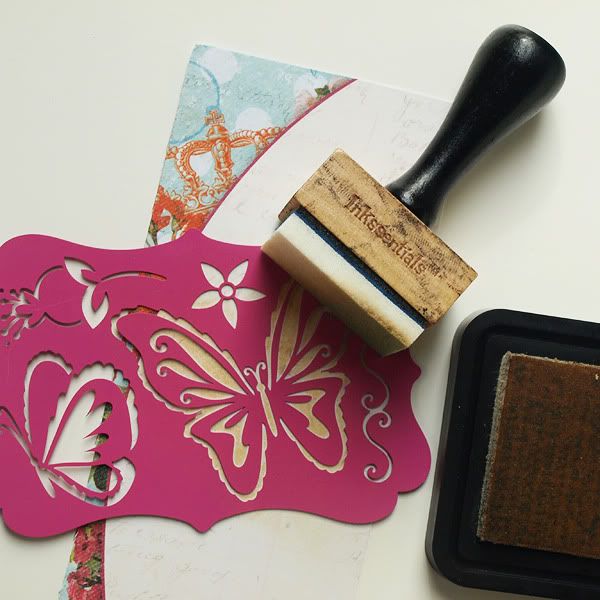
I used a very simple masking technique on the layout below and thought I'd share how I did it.

Posted Image

All that's needed is a mask (I used a butterfly stencil from Momenta), an ink pad, an ink blending tool, and choice of patterned paper.

(note- the paper in this little tutorial is just a scrap- I had forgotten to photograph these steps as I made the actual layout)

Posted Image

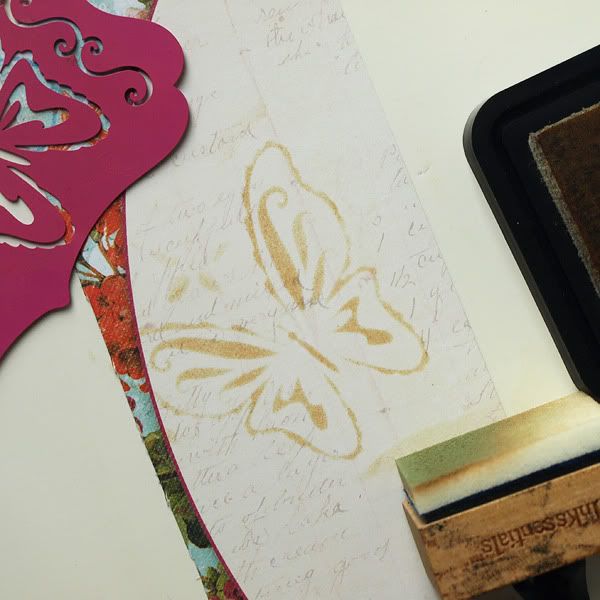
Simply place the mask or stencil in the desired location and apply ink onto the mask. If there are multiple images on your stencil like there are on mine, it helps to cover the other images with tape during the inking process so that you don't accidentally use more of the mask on your layout than you had intended to.

Posted Image

This is the result of running the ink over the stencil.

Posted Image

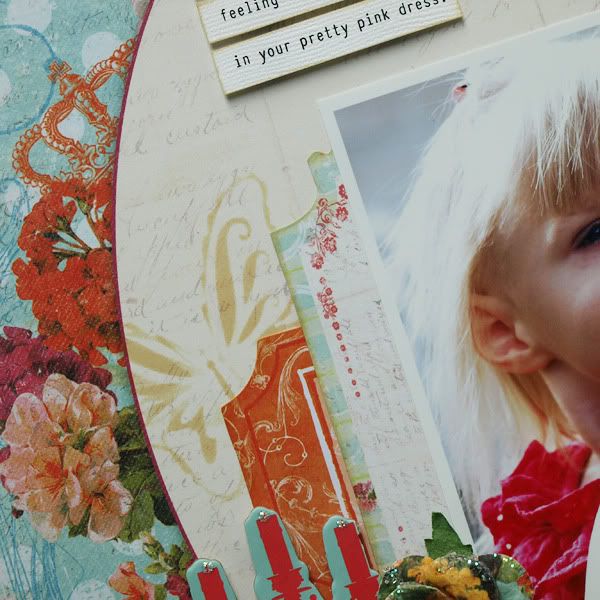
Just a simple way to layer in some added interest!

Posted Image

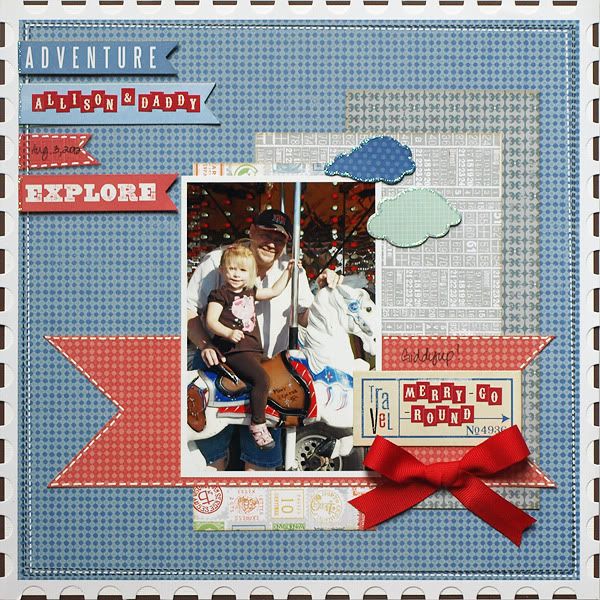
The Creative kit this month includes a super cute decorative edge embossed cardstock sheet with pre-printed pennants in one of the corners. I love the design of this sheet but wanted the pennants to only be red and blue in color instead of the four colors that are there.

Posted Image

That was an easy adjustment- all I did was adhere some blue and red cardstock stickers and chipboard pennants over the pre-printed orange, green, and yellow pennants. This allowed me to keep the original design but change the colors enough to better match the photo.

Posted Image

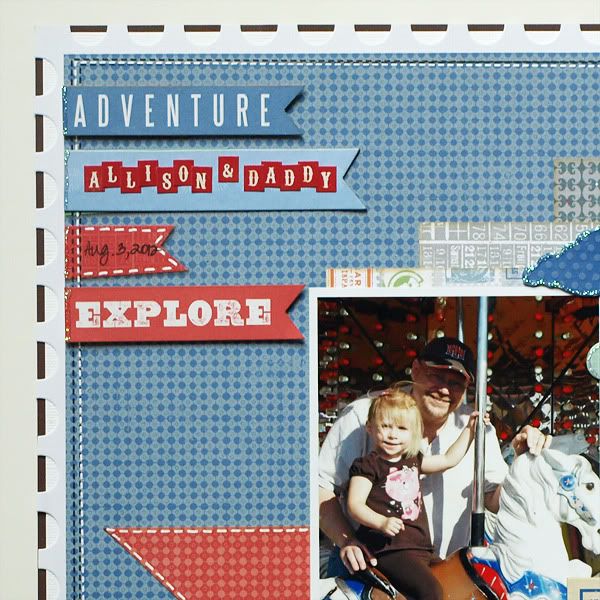
To further coordinate the layout colors with the colors in the photo, I needed to add some brown to go along with my daughter's brown outfit. To achieve this, I simply matted the decorative edge cardstock sheet onto a piece of 11-5/8 x 11-5/8 solid white cardstock, and then matted those onto a piece of 12x12 brown cardstock. The result is the brown dashed edge around the perimeter of the layout.

Posted Image

Have a fantastic weekend!

September 25, 2012

Snow Day

I finally scrapped this photo that we took near the end of last winter.  Allison was really enjoying jumping around in the snow that day!  I loved how these Bella Blvd products perfectly matched her attire :)


September 24, 2012

Lovely Ballerinas

Hi everyone! Today I'd like to share one of my recently created favorites :)  The photo was taken at a ballerina-themed birthday party that my daughter attended for a sweet friend.  I thought these adorable Bella Blvd products were perfect for this.


Thanks so much for stopping by!

September 21, 2012

Happiness

Happy Friday! I have another Bella Blvd layout to share today.  As a side note, if you guessed that I submitted for their call, you're right... but on the bright side of not making the cut, I can share my layouts now :)

I really love these photos of Allison.  She was dancing and doing the cutest poses with her pom poms- I had to scrap these!


September 20, 2012

Easter Bunny Kisses

I finally scrapped this Easter photo recently using some adorable Bella Blvd products.  I was so thrilled to catch this little kiss on camera!  My daughter certainly isn't shy.


September 19, 2012

Momenta Card and Card Tote Set

I have a bright and cheerful Momenta card and tote set to share that could make for a perfect teacher gift!


When my daughter completed her "Parent-Tot" swimming lessons, I thought a beach-themed gift set would be perfect to give to the instructor.  I chose the Family Outings collection for my project.  This set could very easily be recreated in a variety of themes to suit your needs.


I used my score board and this tutorial to create this little card-sized tote bag.  I did change the dimensions of the tote to better suit my 5-1/2 x 4-1/4 inch sized card; the finished tote measures 6 x 4-1/2 x 1.  This little tote is a much more fun presentation of a card than a plain envelope is, isn't it?


This cute little lobster is a clear layered sticker from the beach set, and the glittery star clear layered sticker is from the circus set.  The sentiment is a vellum sticker.


The coordinating card front was made from cardstock scraps leftover from the tote and then matted onto two layers of solid cardstock from the Brights textured cardstock pad.


I was thrilled to find a vellum sentiment sticker that was very similar to the one that I used on the bag.  This sticker is from the Family Outings message sticker kit and is just different enough from the other sticker to set it apart.  This clear layered sticker cluster includes a palm tree and sun from the mini beach set along with a cute little splashing duck from the mini cuddle & coo set.

Thanks for stopping by today!

September 18, 2012

Making Memories Guest Designer Layout

I'm so honored to be featured on the Making Memories blog today!

I was sent some of the adorable new Sarah Jane products to create with, and here's what I came up with:


Is this a super cute boy-themed collection, or what?!  There are bicycles, scooters, rockets, wagons, paper airplanes, pinwheels, and more... all of which are the perfect compliment to photos of the little men in our lives.


I made this simple pinwheel by folding a 2-1/2" square scrap of paper and then centering it with a coordinating pinwheel brad on top of a star-shaped sticker.

As a side note, this little cutie pie holds a special place in my heart.  Not only is he completely adorable, but he's my one and only nephew (I have 5 nieces!).  I'm so glad that my sister-in-law had this perfect photo for me to use with the Sarah Jane products.


I used foam squares behind each of the stickers for added dimension.  I don't know how I could get by without those!  I left some room on the journaling stickers for my sister-in-law to write some journaling if she wishes.

Making Memories supplies:

The design of this layout is actually a lift of my layout that I blogged yesterday, which used the September sketch at My Creative Sketches.  I really liked that sketch designed by Kim Keane, so I used its inspiration again and just tweaked it a bit to suit my needs.

Thanks so much for stopping by... if you'd like to leave me a little comment love over at Making Memories... I'd be really grateful :)

September 17, 2012

My Creative Sketches September Sketch Challenge

The September Sketch Challenge at My Creative Sketches is up and running.  I dug into my stash and pulled out some My Mind's Eye Lime Twist for this one.


We attended a birthday party this summer for a sweet friend of Allison's, where one of the party activities was to make a bead necklace.  Allison enjoyed making hers and wears it quite often.  I was thrilled when the birthday girl's mom sent me this photo of the experience.


The pearl brads that I used for a few of the flower centers are leftovers from my design team term at Eyelet Outlet.  The company has tons and tons of eyelets and brads- these pretty pearl ones are my favorites.


The cute brown heart picks are from a Jillibean Soup warehouse sale box that I bought earlier in the year.


I hope you'll consider joining in the fun... check out the prize...


I know, right?!

You can find all of the challenge details at My Creative Sketches, see you there :)

September 11, 2012

Momenta + Xyron Cards

Hi everyone!  This week Momenta is featuring projects created by the design team using Xyron adhesives.  Here are the cards that I have up on the Momenta blog for the promotion.


My first card features the beautiful Oooh LaLa Coordinating Pyramid Cardstock Pad. This is my favorite of Momenta's new designs. The colors and patterns are so versatile and pretty!


I have to confess that although I've used several Xyron products over the years, I hadn't had an opportunity to try the Mega Runner until now.  Let me tell you, this adhesive runner is awesome! Unlike most of the other dry adhesive runners that I've tried, Xyron's gives me a few seconds to adjust the placement of what I'm adhering to just where I want it before it's stuck where it's at. I LOVE THAT!

Supplies:
kraft cardstock (Bazzill)
ribbon (ribbonFX)
ink (Ranger)
border punch (Martha Stewart)


This card features the lovely Family Heritage Pyramid Cardstock pad.  It's another fabulous addition to Momenta's product line!


Again, I loved how easy it was to adhere my cardstock layers exactly where I wanted them using Xyron's Mega Runner! I'm so glad I had a chance to try this tool... it is now on my frequently used tool list.

Supplies:
kraft cardstock (Bazzill)
trim (misc.)
ink (Ranger)

September 5, 2012

My Creative Scrapbook September Kit Reveal Blog Hop

Welcome to the My Creative Scrapbook Blog Hop!


Pam and the design team are thrilled to celebrate the reveal of the beautiful September kits with an inspiration-filled blog hop complete with PRIZES!

If you are hopping along with us, you should have arrived here from Juliana Montoya's blog.  If you just happened to stop by here to check in on me, please head over to the My Creative Scrapbook blog and start the blog hop from there so that you don't miss out on any of the inspiration, prizes, and fun!

Be sure to leave comments as you hop along to each blog... your name could be drawn for one of the prizes!

This month, I worked with the Main kit and the Creative kit.  Here are photos of the kits:

September Main Kit:

September Creative Kit:

Here is what I created with the beautiful Main Kit:


Here is what I created with the beautiful Creative Kit:


We are so excited about our kits and hope that you are, too.  For more information about any of the kits, or to reserve your kit, please visit http://www.mycreativescrapbook.com/kits.htm

Before you go, remember to leave a comment and follow my blog to be eligible for the prize drawings!

Your next stop on the blog hop is Luzma Bruna's blog.
 
BLOGGER TEMPLATE BY DESIGNER BLOGS