August 31, 2015

How to Create Simple Mixed Media Scrapbook Page Backgrounds

I'm excited to share some stepped-out background work photos to show you how just a few simple mixed media techniques can take your scrapbook pages to a whole new level.

I start all of my backgrounds with a layer of clear gesso.

  
Then I apply color with spray mists.  Here I'm using products by Lindy's Stamp Gang and Heidi Swapp.  My favorite way to apply the mist is to spray it onto some plastic packaging (like the packaging that most embellishments come in) and then "stamp" the sprayed plastic packaging onto the background paper.  This allows nice control over where the mist will go on the paper.  It is important to let each mist color dry completely before applying the next color, otherwise the colors will just mix together, and, the paper will warp a lot.


I like to add black for contrast.  Here I used some background stamps from Prima and Viva Las Vegastamps with black ink here and there on the page.


For even more contrast and texture, I applied super heavy gesso here and there through a Prima stencil.


I started the next layout the same way- first clear gesso then layers of coordinating spray mists using the technique of spraying onto plastic packaging and then stamping that onto the paper.


Here I also sprayed some water onto the mists near the bottom of the paper, then stood the paper up vertically to allow the mists to run a bit, resulting in a drip effect.


Black contrast with random background stamping (stamp from Viva Las Vegastamps) and white contrast with random placement of gesso through a stencil.


I added my paper layers and then some more color with mists.


Next layout: clear gesso painted onto the background paper, then colors with spray mists.


I picked up the idea of drawing random circles on the background from some very talented scrappers out there, Riikka Kovasin and Terhi Koskinen.  So simple yet so effective!


Here I added a layer of white thread on top of my paper layer pile for more texture.


Black contrast to complete the layout, using a chevron stamp with black ink.


Below is the kit that I used, the gorgeous My Creative Scrapbook August Limited Edition kit:


I also used Lindy's Stamp Gang and Heidi Swapp sprays with my Main kit work:


Contrast was achieved by using white cardstock for the background.


and on this layout as well:


Don't worry that a lot of your background work will get covered up by other layers and embellishments.  Just have fun!


Below is the awesome My Creative Scrapbook August Main kit:


For full descriptions of the kits, subscription information, and more, please visit MyCreativeScrapbook.com

August 29, 2015

Today - UmWowStudio

Hello friends!

I have a beach layout to share today inspired by the current mood board at Scrap Around the World.  It's really fun to play along with their challenges, so if you haven't tried it yet, I encourage you to check it out!

I'm featuring some wonderful chipboard, flair, and a stencil on this piece, all from UmWowStudio.


I love the circle confetti stencil!  First I used it with a pen to add some circles here and there on the background paper.  Then I used it with super heavy gesso to create bold white contrast and texture.  When dry, I added some shades of blue with Lundy's Stamp Gang sprays.


The chipboard pieces were terrific for my beach theme as-is in all their raw glory, but I did treat them with a coat of clear distress crackle paint for some fun detail and texture.  I think it makes the chipboard look kind of sandy, like the beach!


This fun piece of flair was the perfect finishing touch for my embellishment cluster.


What do you think of the pretty Maja Design papers?

UmWowStudio products used:
 Arrow Title Mash!
Circle Confetti Stencil
Oh The Places You'll Go Flair
Vintage Clock Face

other products:
patterned paper: Maja Design
flowers, button: Prima Marketing
sprays: Lindy's Stamp Gang
crackle paint: Ranger

Scrap Around the World August Mood Board
I was inspired by pretty much everything in this board!  The beach photo, the blue and tan colors, the sandy texture, the circle shape of the charm, and the overall tranquil feel.
(Click on the link to visit the challenge site)

August 17, 2015

Adventure - My Creative Scrapbook

The August sketch challenge has gone live at My Creative Sketches.  Have you seen it?  As always, Pam has a beautiful prize package to give away to the challenge winner.  Here it is:


Here's the August sketch:


I used the fun My Creative Scrapbook August Main kit to play along with the challenge.  Here's my take on it:


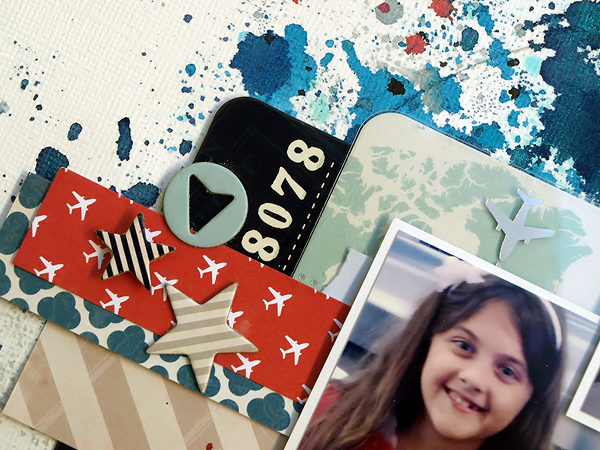
The Pink Paislee Atlas collection couldn't have been more perfect for these photos of my nieces arriving at the airport to stay with us.


I added 4 different Lindy's Stamp Gang sprays (3 blues and a red) and a Heidi Swapp color shine spray (silver) to create the background.


I also used the Heidi Swapp spray to color the "today" wood piece.

I hope this inspires you to play along with the sketch challenge!  The challenge is open through September 14th, so you have plenty of time :)  All of the information can be found on the My Creative Sketches blog, HERE.

August 12, 2015

This Happened Mixed Media Layout + Start to Finish Tutorial - UmWowStudio

Hello friends!  I'm up on the UmWowStudio blog today with my very first project as part of the new creative team.  I thought it would be fun to include a start to finish tutorial- I hope you enjoy it :)

I had lots of fun playing with UmWowStudio goodies to create this layout of my daughter with her cousins.  Those girls can really lay on the sass haha!

Here are the steps to create this layout:

Choose a photo and set it down on your background paper in the area where you think you will adhere it.  Once you're satisfied with the location of the photo, use a pencil to draw some random circles around it (do not adhere photo yet).  Next, select some chipboard pieces from the Arrow Title Mash! set and set them down in various places on the page to get a general idea of your design.

 Place the selected chipboard pieces onto a craft mat.

Use a paint brush to cover the chipboard pieces with white gesso, then set aside to dry.

 Layer six pieces of patterned paper (I used the Ska vi ta en Fika? collection from Maja Design).  When satisfied with the arrangement, staple the layers together.

 Time to add color!  Prep the background paper by applying a layer of clear gesso onto it (this step not shown).  Let dry.  Then use sprays/mists to build layers of color on the background paper.  It's important to let each color dry completely before applying the next color.  I like to start with light colors followed by dark colors, so I used light purple first, then dark purple, followed by light blue, then a darker blue, and finally a light green followed by a darker shade of green.

Apply super heavy gesso through the Circle Confetti Stencil as shown; let dry.

 Time to add color to the chipboard!  Use clear embossing ink with coordinating colors of embossing powder and a heat tool to customize those awesome chipboard pieces.

Now you can glue everything down!

 Here's another look at the completed page.  As you can see, I left the "this happened" Arrow Title Mash! chipboard piece and the Damaged Punchinella Background chipboard pieces white.  I love the contrast!

Some closeups:

 I tucked a fun piece of flair, "be an adventurer", from the Oh The Places You'll Go Flair set, into this embellishment cluster.

 This is a closer look at the yummy dimension achieved with a piece of the Damaged Punchinella Background chipboard and gesso through the Circle Confetti Stencil.

 Here's the heat embossed arrow, heat embossed chevron, and gesso'd title piece from the Arrow Title Mesh! chipboard set.

 This is the balancing cluster on the lower left of the page.  More stencil work topped with a punchinella piece.

 Heat embossed chevrons and gesso'd punchinella piece on lower right of page.

and those sweet, yet sassy, girls!

I hope you'll give some of these products and techniques a try!

UmWowStudio products used:
Arrow Title Mash!
Circle Confetti Stencil
Damaged Punchinella Background
Oh The Places You'll Go Flair

other products:
patterned paper: Maja Design
flowers: Prima Marketing
sprays & embossing powders: Lindy's Stamp Gang
distress ink: Ranger

My color choices were inspired by the August Lindy's Stamp Gang color challenge!


I used the following Lindy's sprays:
Caribbean Blue
Luscious Lime
Merry-Go-Round Green
Pop Rock Purple
Sweet Violet Purple Teal
TiffanyLou Blue

and the following Lindy's embossing powders:
Merry-Go-Round Green
Pop Rock Purple
Tilt-A-Wheel Teal

August 9, 2015

My Creative Scrapbook: Memory

I have another My Creative Scrapbook August Main kit layout to share today!

While for yesterday's layout I pulled the bright, summery Carta Bella Soak up the Sun goodies from the kit, for today's layout I used the red, white, and blue Pink Paislee Atlas collection products.  Although travel-themed, the Atlas line worked wonderfully for my photo of my little girl enjoying a summer strawberry!


It's not often that I use red, but how could I not use it when the inspiration for my design was my daughter's red juicy strawberry haha!  I enjoyed the result of the strong colors against the crisp white background.  The spray mists that I used on the background are all from Lindy's Stamp Gang.


That red piece of patterned paper that you see in the paper layers there actually has a bunch of tiny white airplanes all over it.  Since the airplanes didn't fit my theme, I just strategically trimmed the paper to only show part of each airplane, if that makes sense.  That way, I can still see a pattern on the red paper, but I don't really notice that the pattern is actually airplanes, unless I look really closely.


To color the wood title piece, I sprayed it with some red spray mist.

Here's a photo of the August Main kit:

For information about purchasing a kit, please visit MyCreativeScrapbook.com
 
BLOGGER TEMPLATE BY DESIGNER BLOGS